
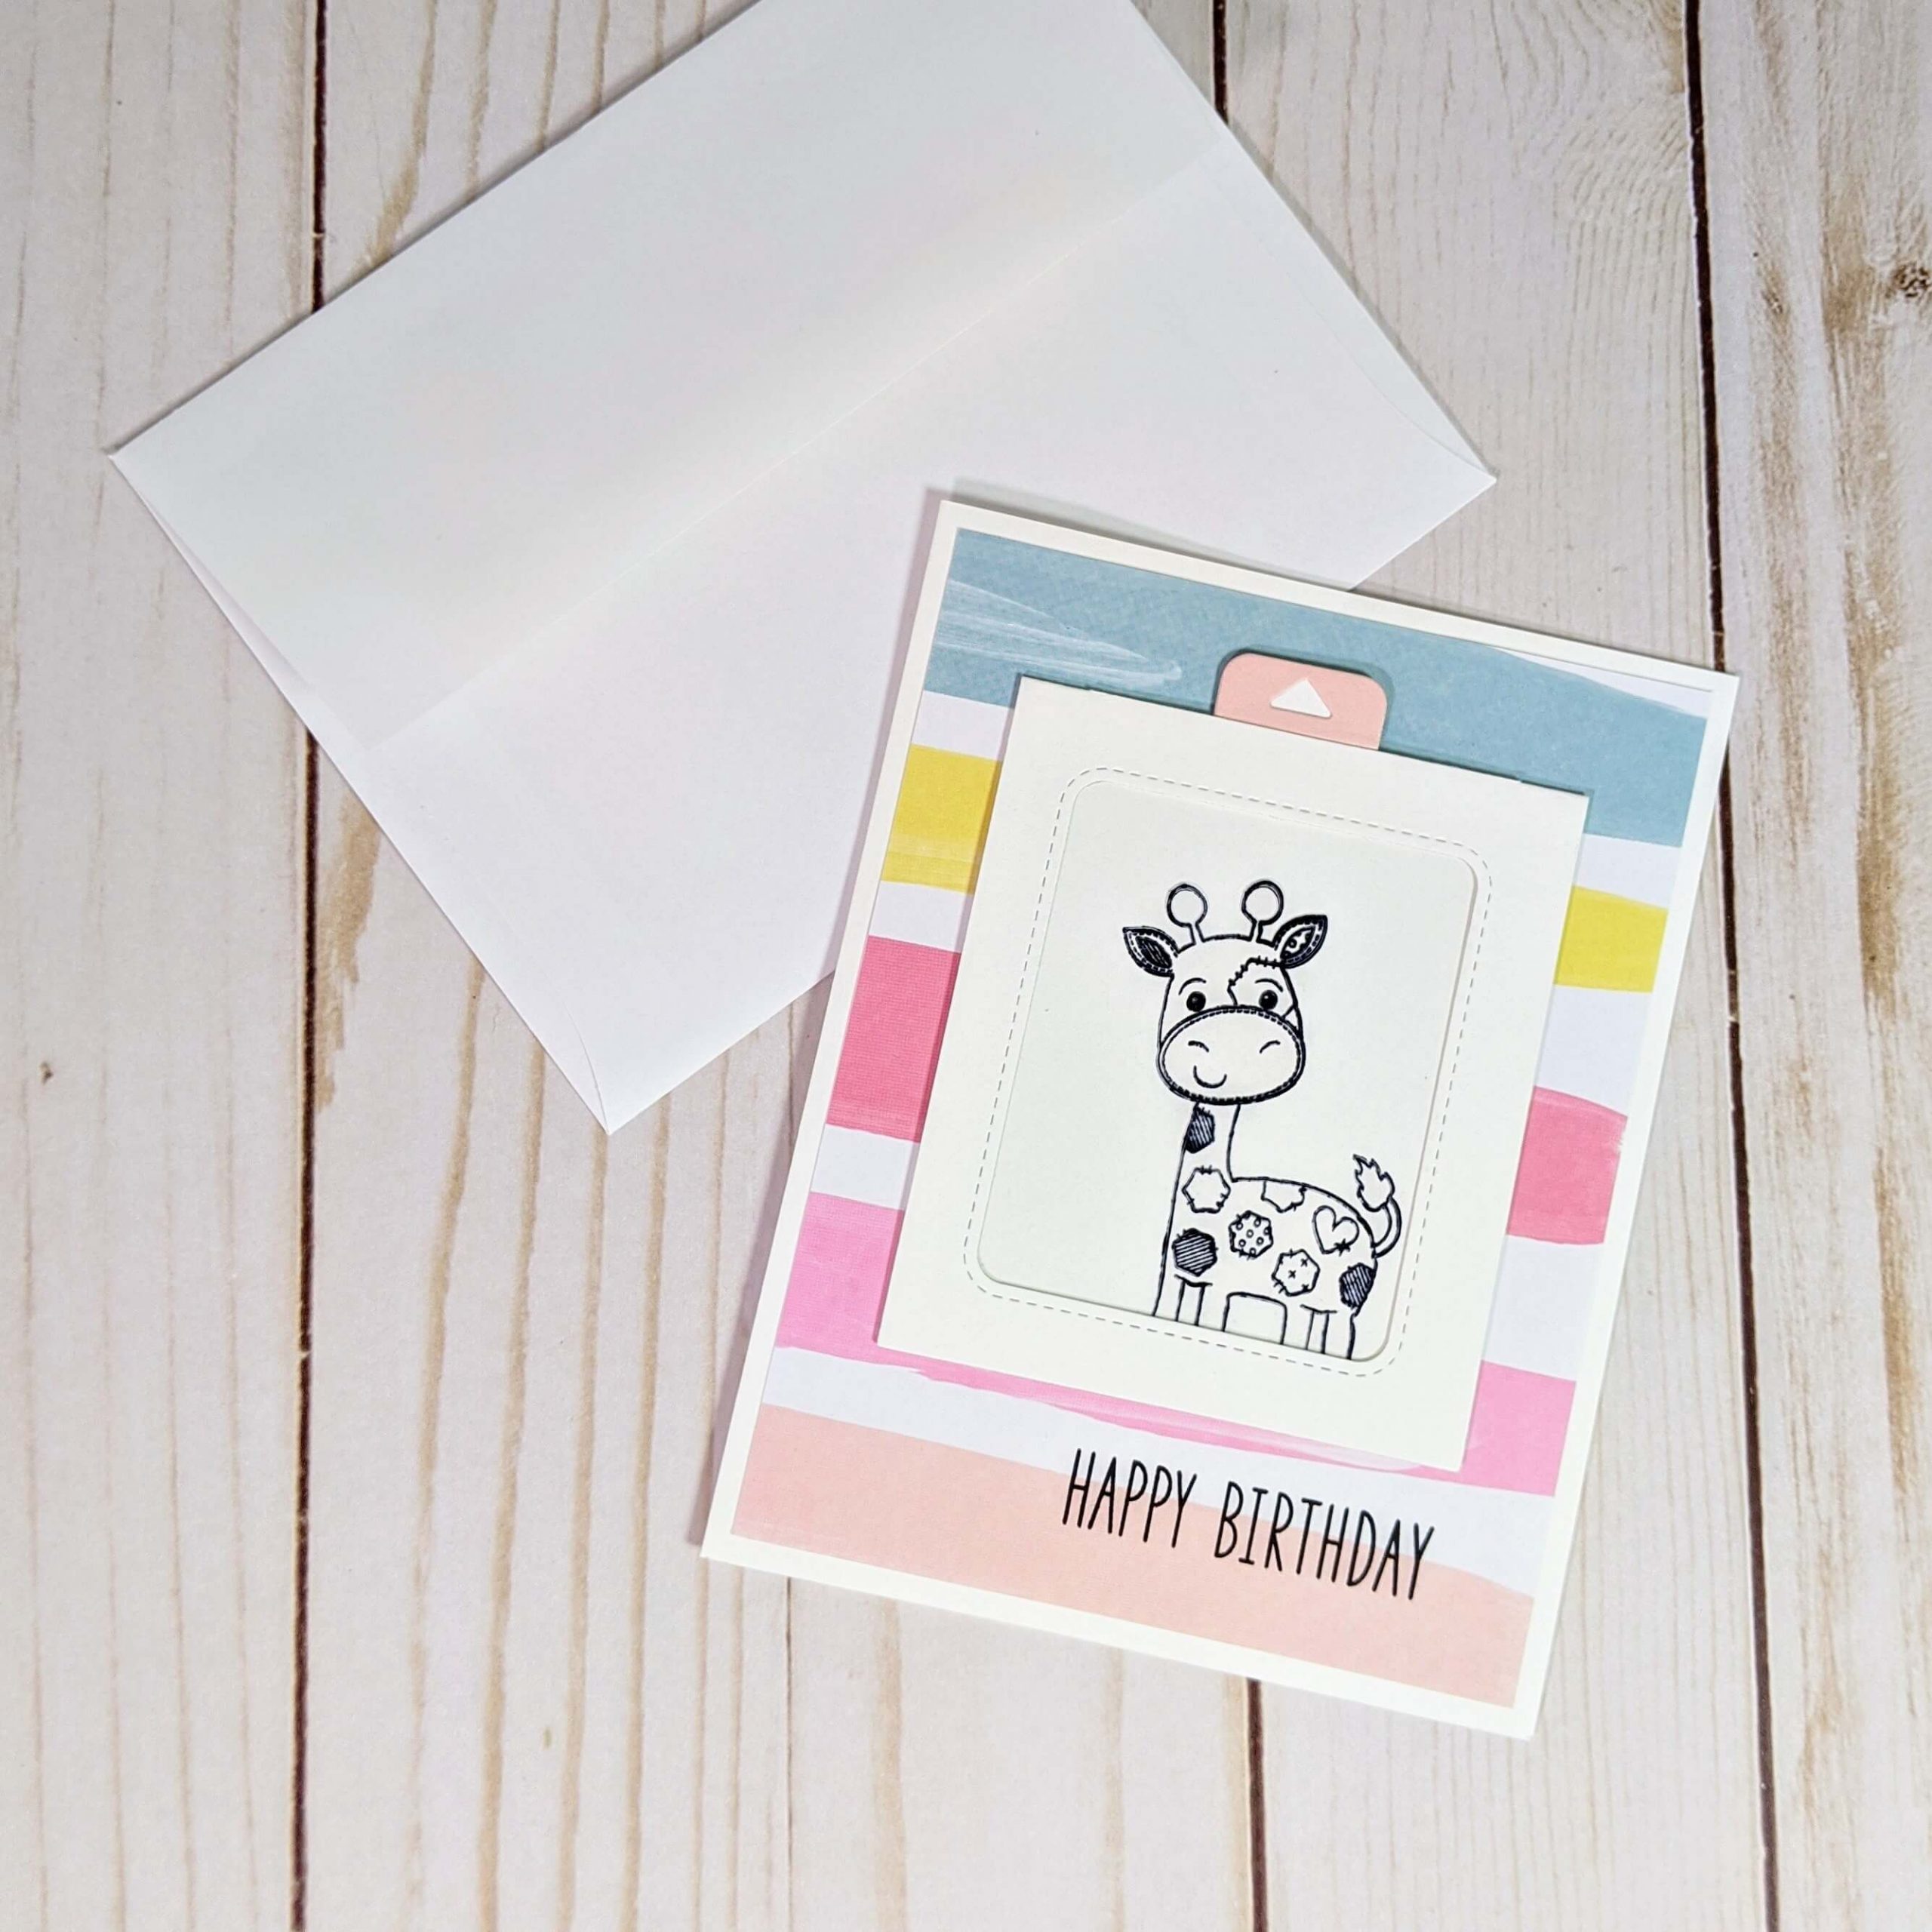
Alright, let’s talk about interactive cards. These projects are becoming really trendy in the paper crafting space. And with companies like Lawn Fawn making die sets that are so easy to use it’s easy to se why they are picking up so much traction. There are all sorts of interactive cards out there, but today we’re going to be focusing on slider cards. More specifically, I bought the Magic Color Slider die set from Lawn Fawn and this is the first card that I made using that set.
I’m really excited to show you how it turned out, and what I did to make it. So continue reading to find the materials that I used and the Giraffe Magic Color Slider tutorial below.
Watch the Giraffe Magic Color Slider here.
Materials Used:
This blog may use affiliate links when they’re available. If you choose to make a purchase through one of these links, I may receive a small commission at no cost to you. I don’t make recommendations lightly, and will only link to products I know and trust.
- Faber-Castel Polychromos Colored Pencil Set – 60 Pieces [Amazon]
- Faber-Castel Polychromos Colored Pencil Set – 120 Pieces [Amazon]
- Sizzix BIGkick Machine [Scrapbook.com] [Amazon]
- EK Tools EK Scoring Board 12×12 [Amazon]
- Feather No.55 Switch-Blade Shear, 5.5 Inch [Amazon]
- Fiskars Recycled Bypass Trimmer, 12 Inch [Amazon]
- Trim Slant Tip Tweezers [Amazon]
- Misti Stamp Tool Original Size Stamp Positioner [Amazon]
- Lawn Fawn Stamp Shammy [Scrapbook.com] [Amazon]
- Ranger Archival Ink Pad, Jet Black [Scrapbook.com] [Amazon]
- Tsukineko StazOn Solvent Ink Pad – Jet Black [Scrapbookpal.com] [Amazon]
- Penny Black – Happy Heights Stamp Set [Scrapbook.com] [Amazon]
- Lawn Fawn – Magic Color Slider Die Set [Scrapbook.com] [Amazon.com]
- Lawn Fawn – Really High Five Stamp Set [Scrapbook.com] [Amazon]
- Neenah Solar White Cardstock [Scrapbook.com] [Amazon]
- Grafix Acetate Pad, Clear [Amazon]
- Scrapbook Adhesives Initially Repositionable Mounting Squares [Scrapbook.com] [Amazon]
- Scor-Pal Scor-Tape – 1/8″X27 Yards [Amazon]
Giraffe Magic Color Slider Tutorial:
Step 1.
I think interactive cards are the most time-consuming type of card, but they are also so rewarding when you look at the finished project and think, “wow! I made this.”
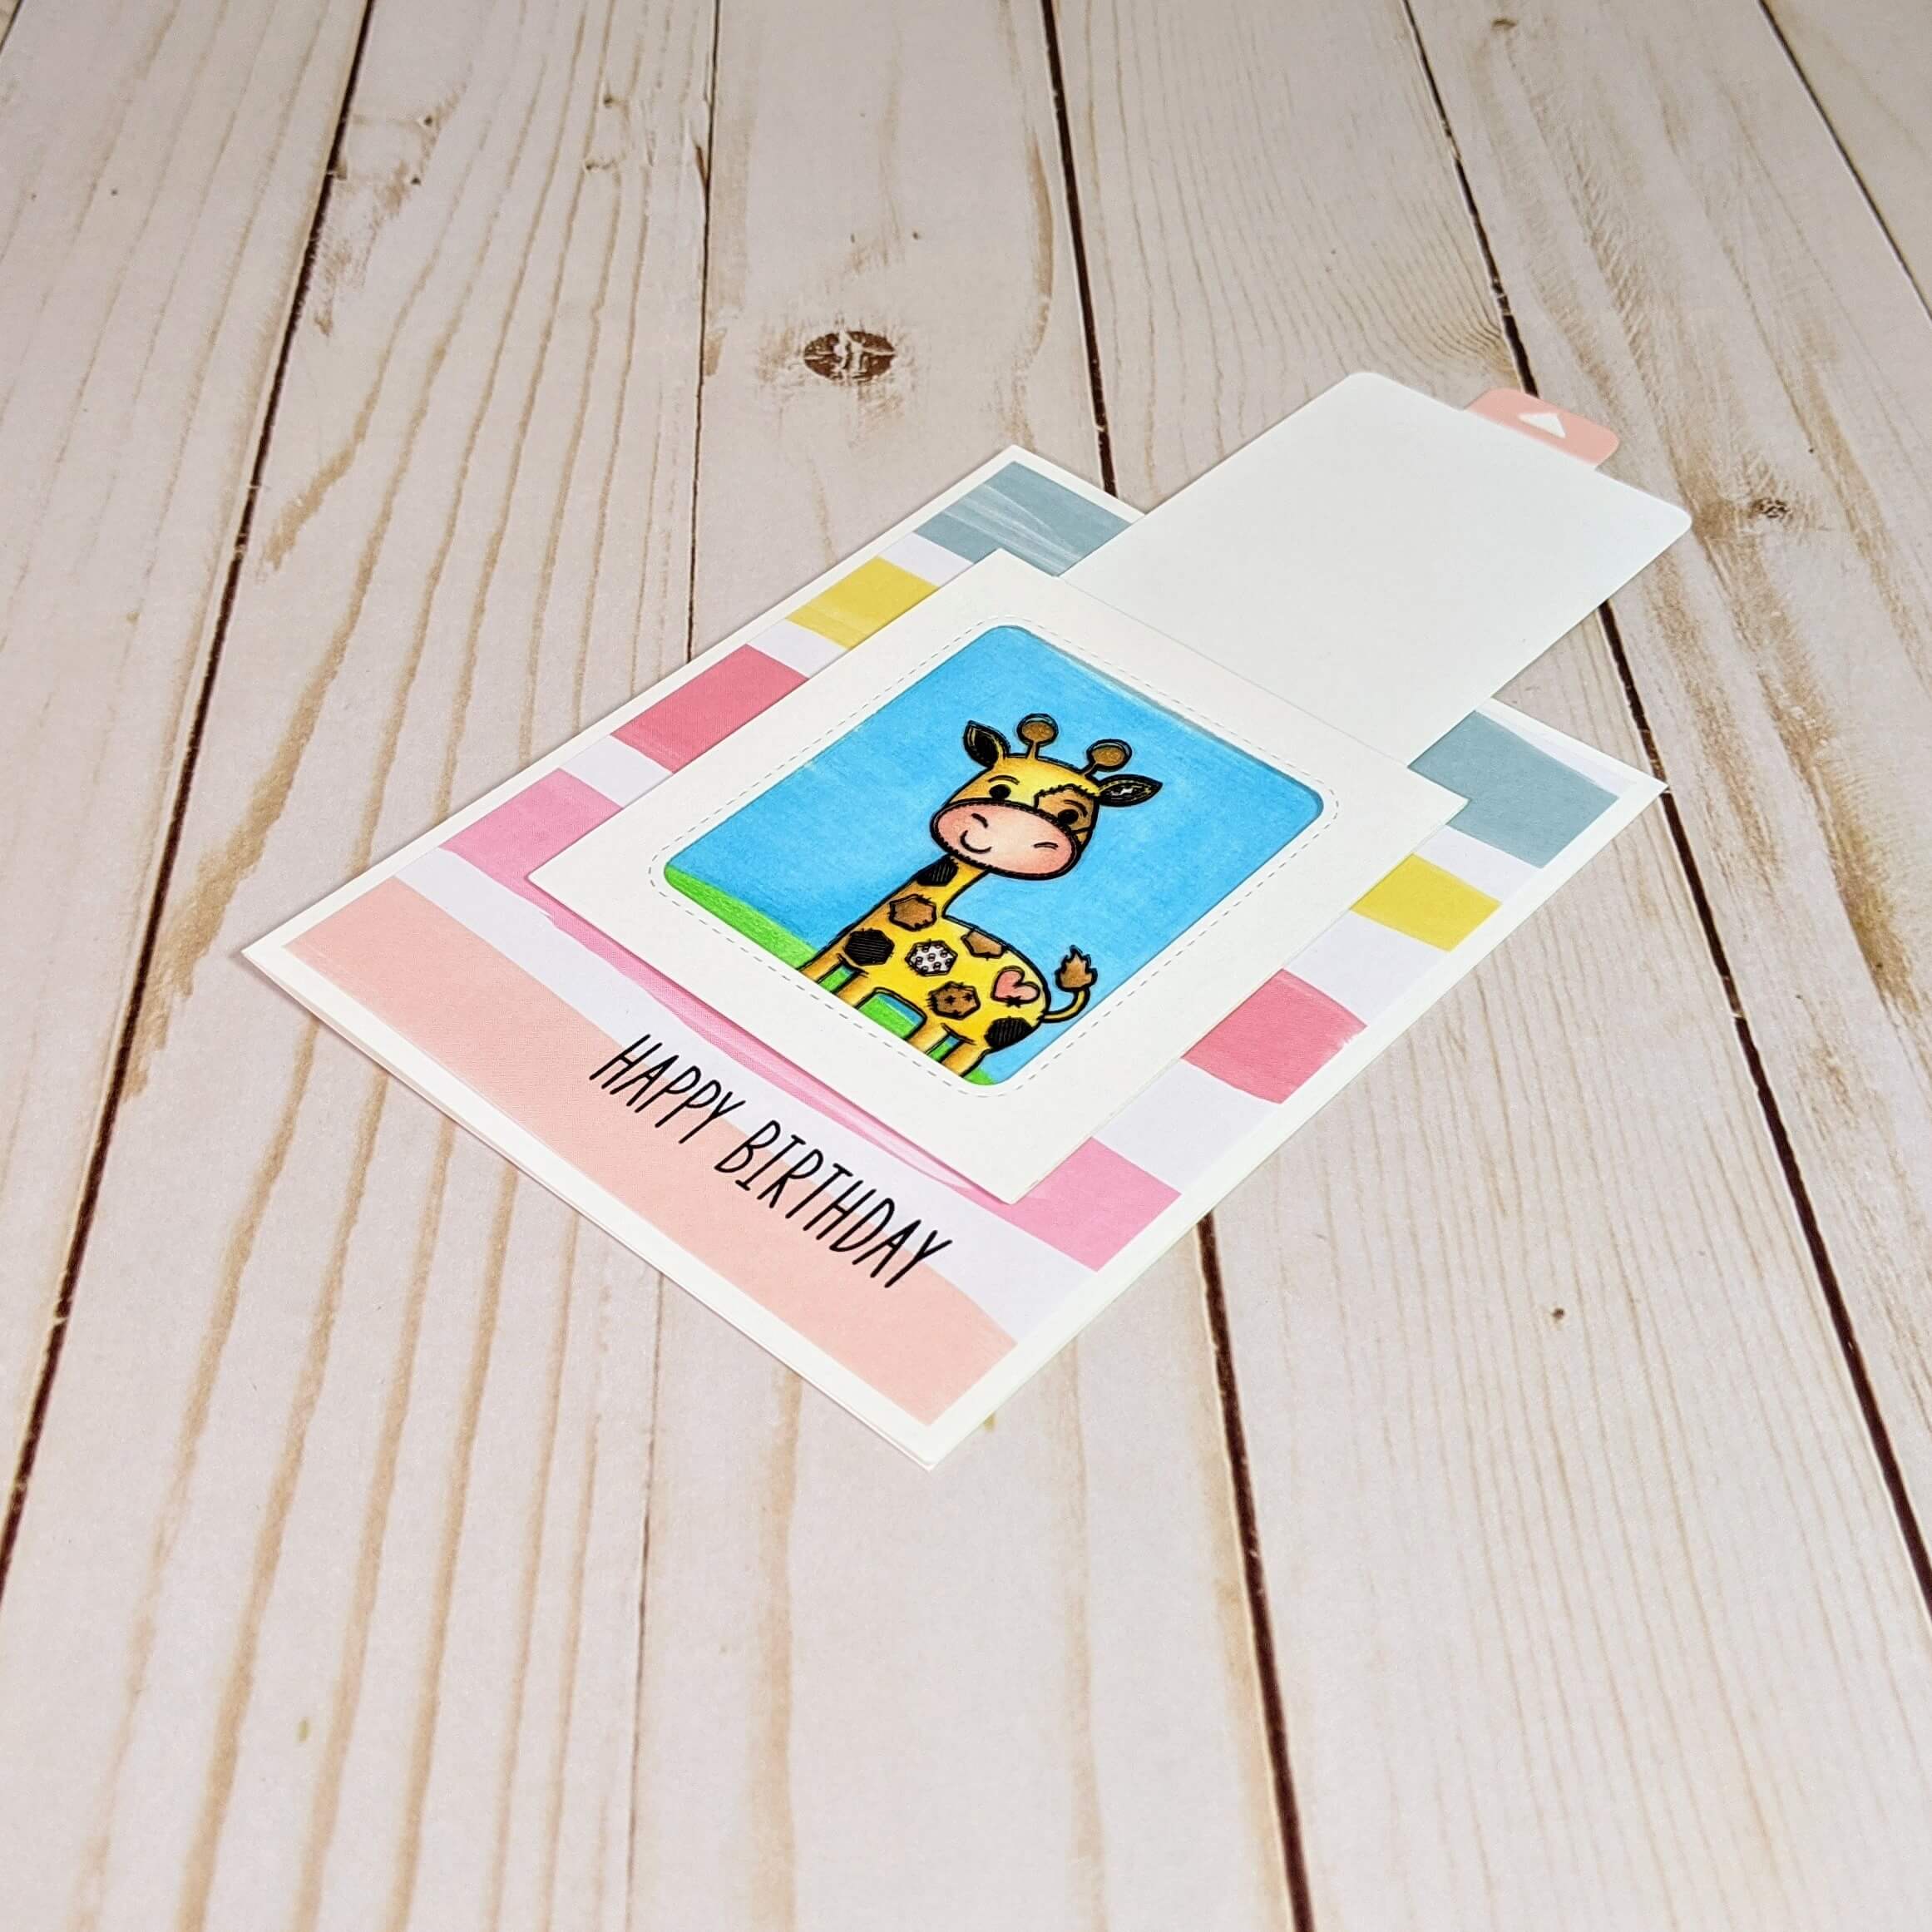
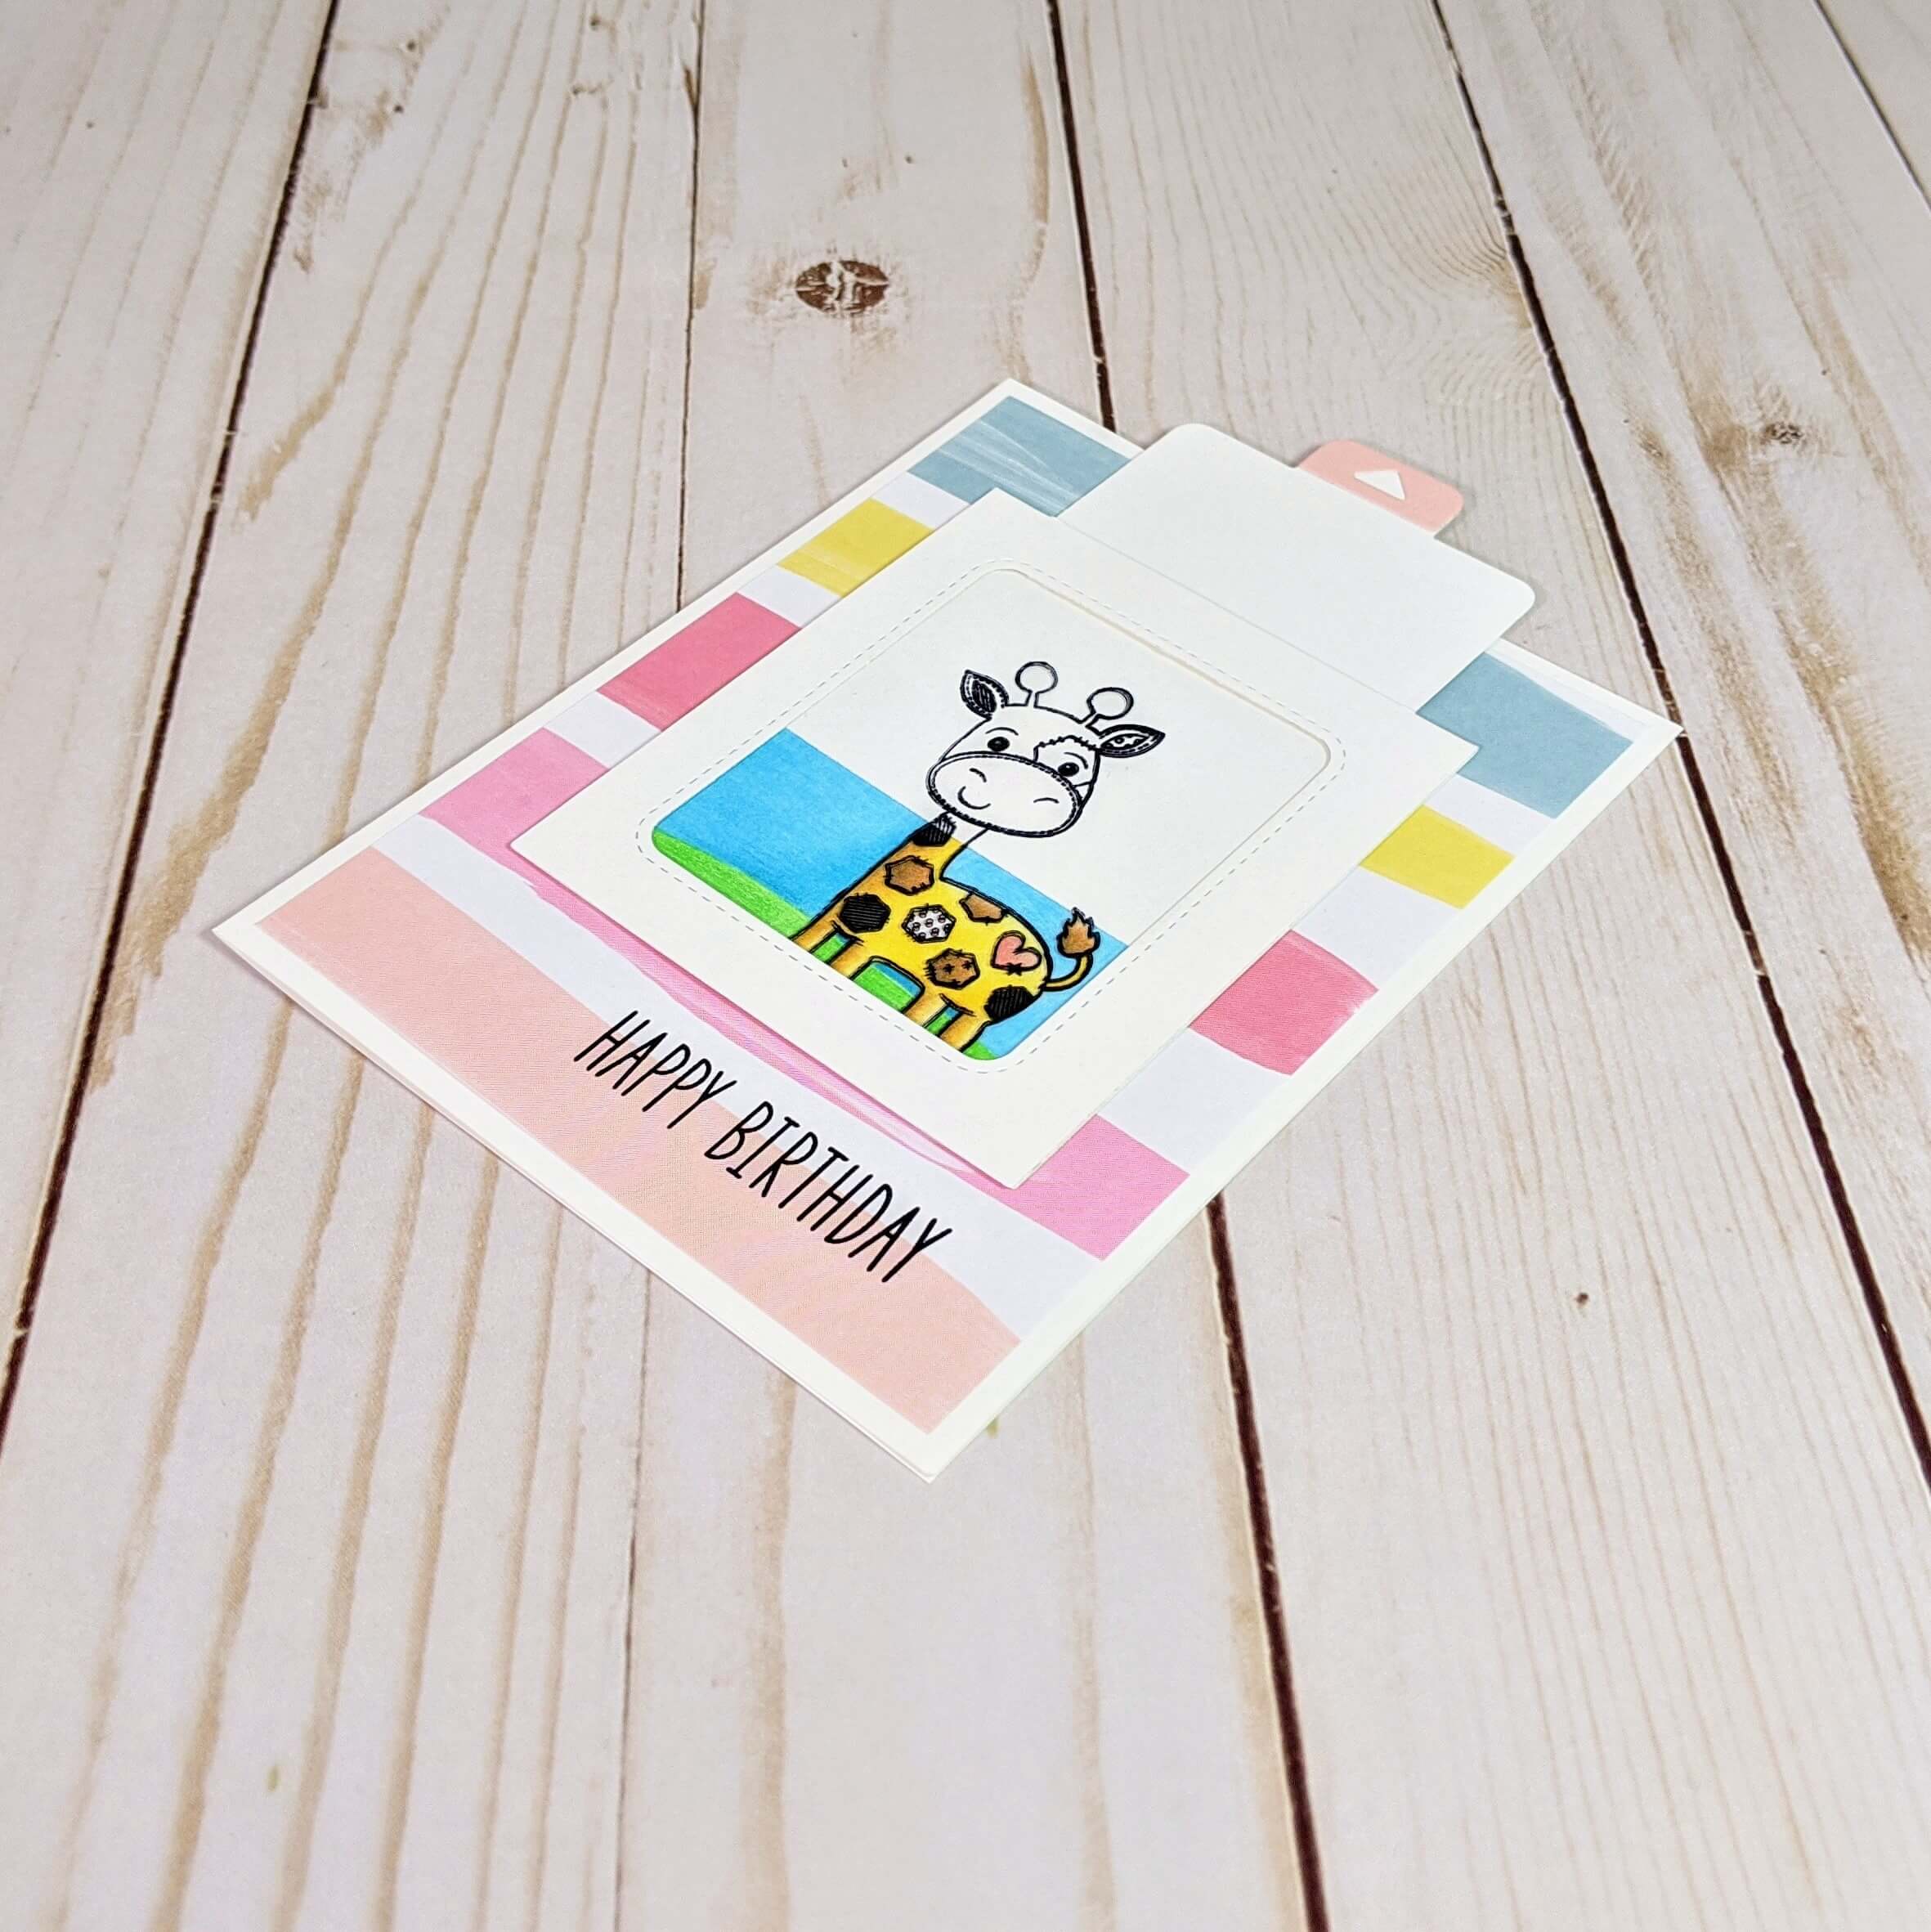
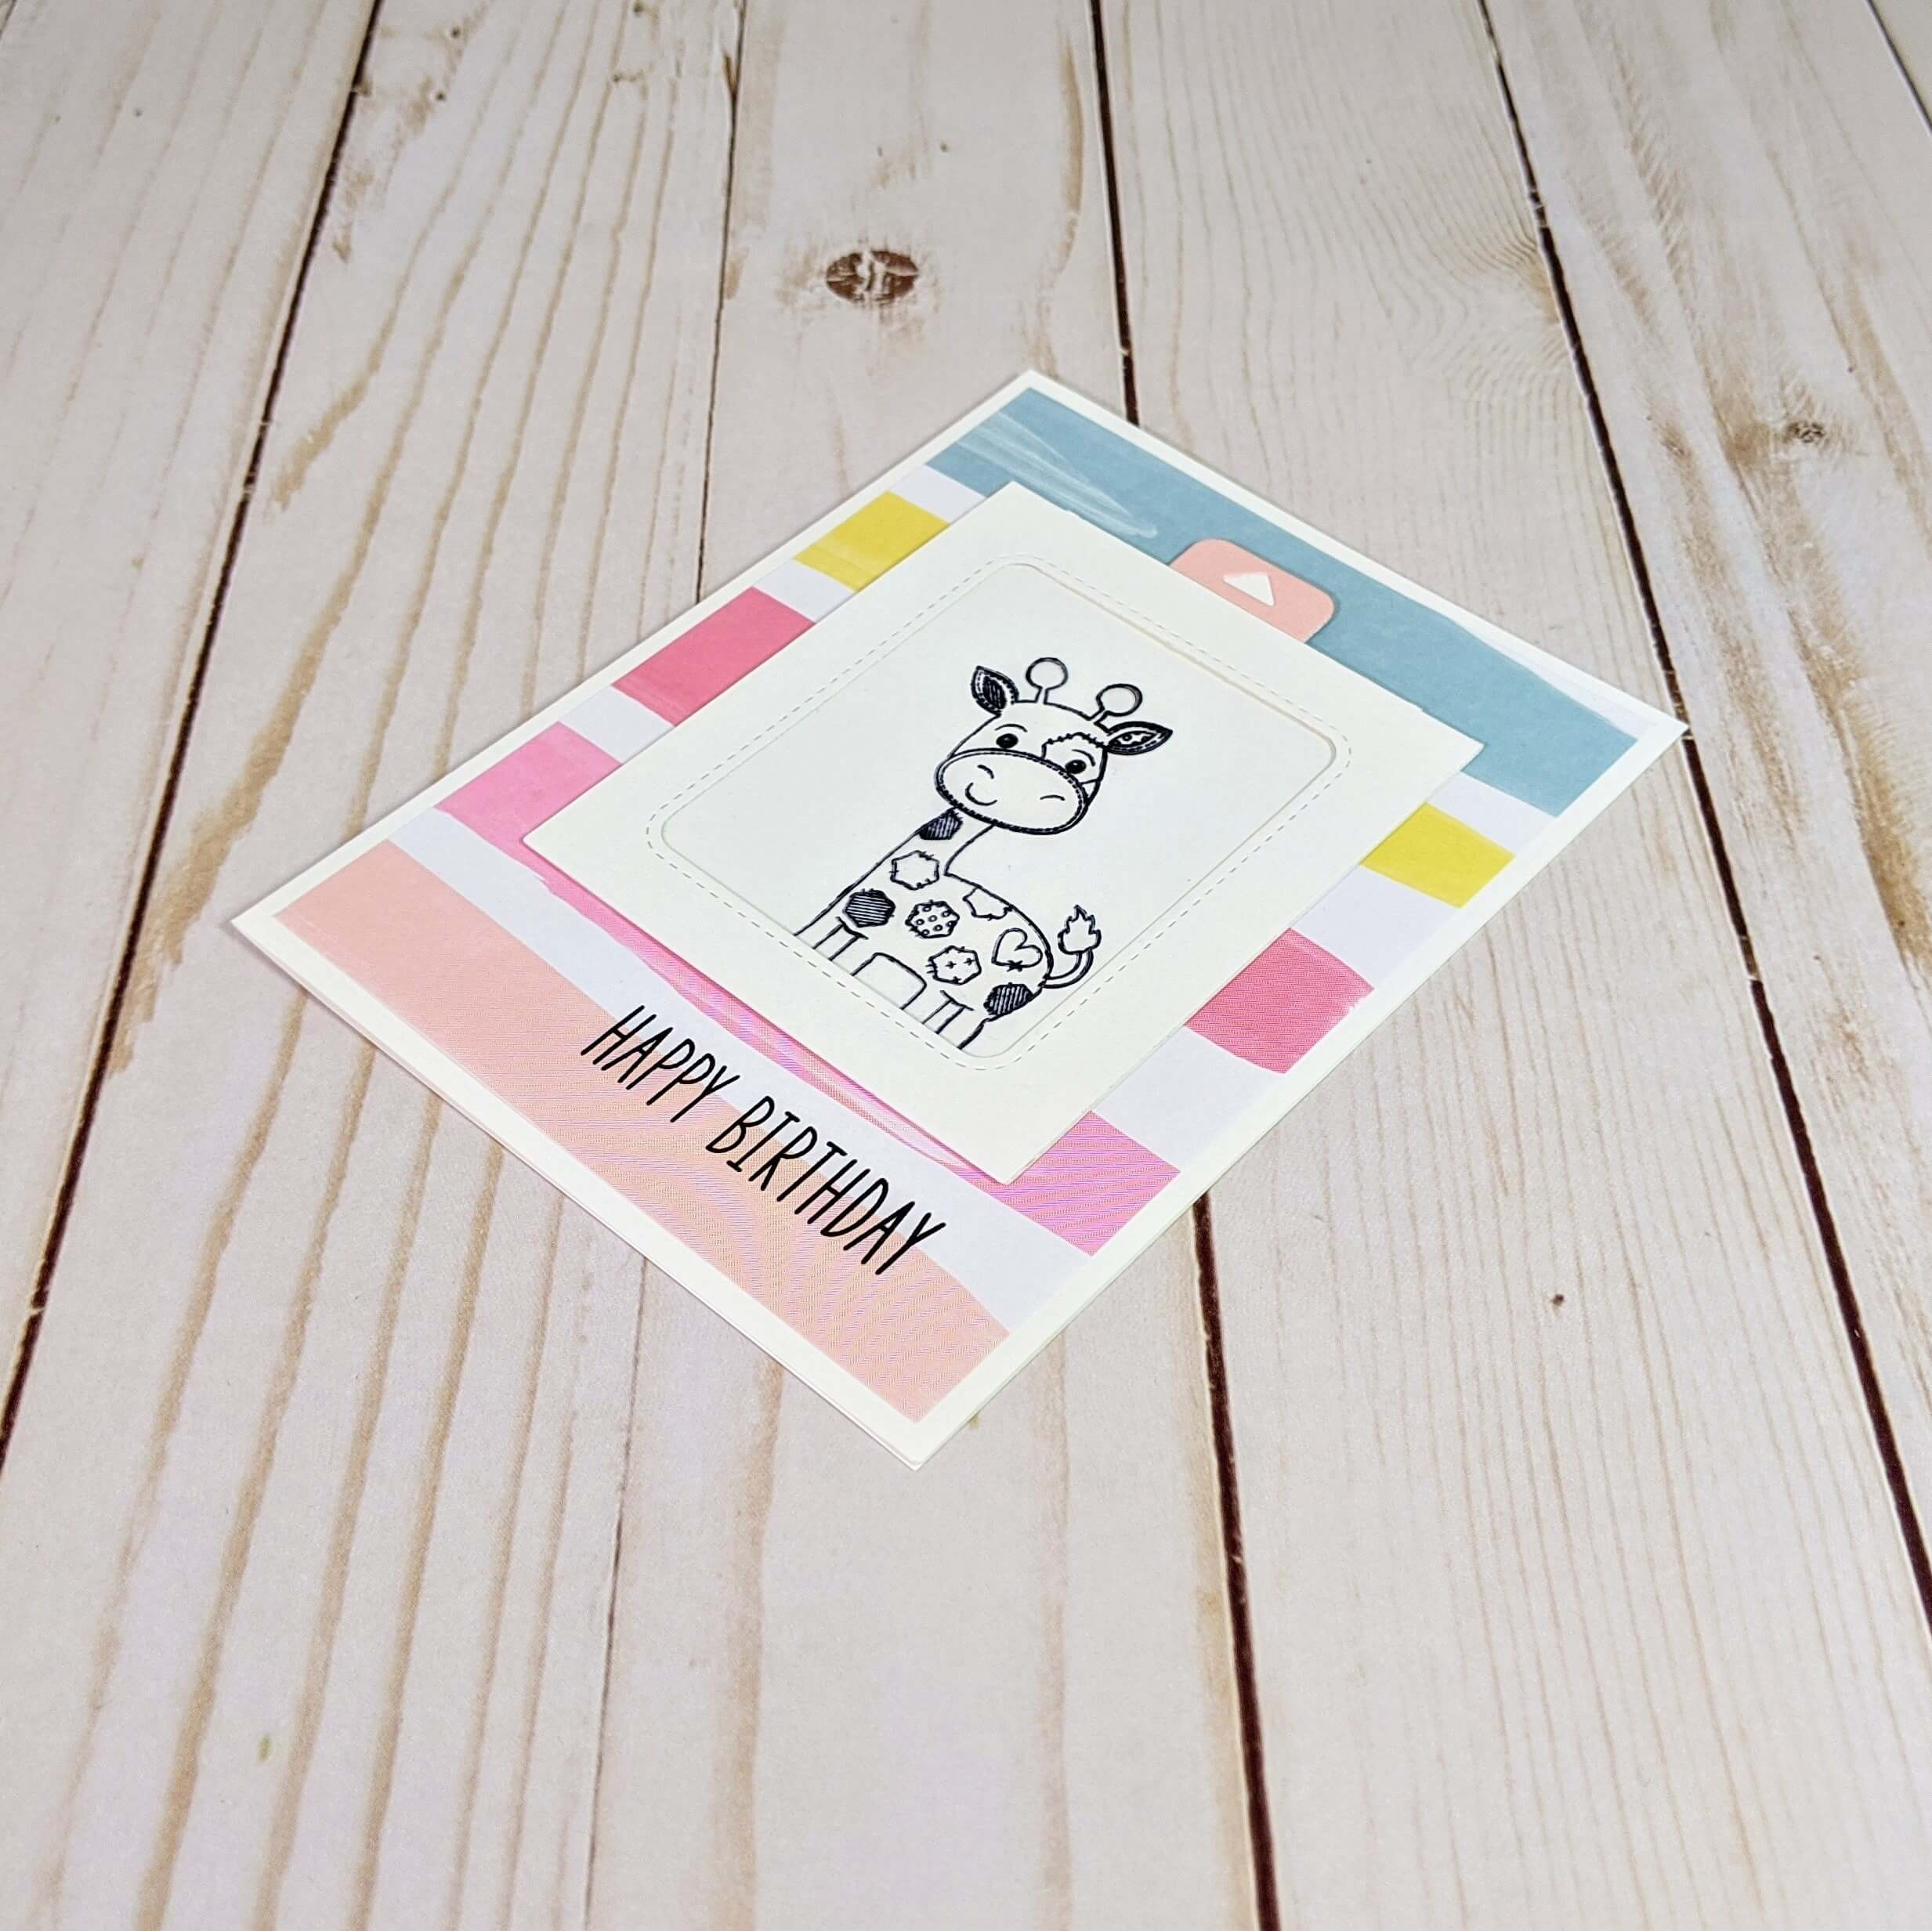
For this project, I used the Lawn Fawn magic color slider die set to cut out all the pieces needed to make the base for this card. I was a little lost when I first got my dies in the mail, but Lawn Fawn has a really well-done video that walks you through how to put all the die pieces together. Using Neenah solar white cardstock to create the base, the rectangular window, and all the movable components. Then I used the large square die to cut the Grafix acetate for this card.
Step 2.
Next, I stamped this adorable giraffe from Penny Black’s High Hights stamp set on the bottom of the slider folder in jet black archival ink. I then positioned the acetate over top of the folder in my Misti stamping tool and stamped the same giraffe on the acetate using Stazon solvent jet black ink. I left the stamp down for a moment so that the ink has time to apply.
Tip: You should also wait for the ink to fully dry before attempting to stick your acetate on the base.
Step 3.
After stamping the image and applying the acetate to the folder with Scor-Pal tape, I used my Faber-Castel Polychromos colored pencils to color in the giraffe. I used the following colors to create this look. I always layer the colors lightly so I get a smooth transition from a darker color to a lighter color. So I will start with the darkest color then move to the lightest. I’ll apply 2-3 layers to get the desired finished product.
- Black Dots: 175, 275, 274
- Brown Dots, Tail, and Antlers: 178, 180, 187
- Heart and Nose: 131, 189, 132
- Yellow Fur: 182, 183, 185
- Grass: 163, 162
- Sky: 156, 154
Step 4.
Once the coloring was complete, I grabbed sliding tab and placed it in the slit above the giraffe. Then, I covered the U shaped die from the magic color slider die set in Score-Pal tape, front and back, and laid it down so that it would outline the giraffe.
Tip: Your slider will get stuck on anything that’s risen off of your paper, so if you plan to add a second layer of paper under your sliding tab, make sure to use a tape runner or light glue to keep it in place. Mounting squares won’t work very well here.
Step 5.
Lastly, I closed the acetate window and slid the tabbed slider back and forth. I also decorated the tab with pink cardstock to match the striped cardstock I used on this card base. The Happy Birthday sentiment came from the Lawn Fawn Really High Five stamp set. I’ve been using this stamp set a ton lately.
Interactive cards are just so much fun. I hope I’ve inspired you to make some of your own! And don’t forget to follow me on Instagram, Facebook, or Pinterest for the latest updates! You can also shop all the handmade cards that I’ve designed here.